GUI - object properties
Object Properties (mesh)
This is the panel visible when opening the Object Properties of a mesh.

Mesh type (dropdown list) - Cube or Poly mesh. Decides if the object should be exported as a cube or polymesh. Objects with non-cuboid shapes must be polymesh type or you won’t be able to export them.
Note
Polymesh models are still an experimental Minecraft feature and they could be removed from Minecraft. Experimental features are not allowed on the Marketplace, so keep that in mind if you’re creating content for the Marketplace.
UV Group (textfield) - displays the UV-group name of the selected object.
Mirror - the mirror property is used only during the UV-mapping. It affects the mapping of the object’s faces in the same way as Minecraft’s mirror property of a cube.
Inflate - stores the Minecraft’s inflate property value of the cube.
Note
Editing the Inflate value through this panel does not change the dimensions of the object, but it does change the inflate value in the exported object. If you want to inflate/deflate the object, you should use the inflate operator from the sidebar.
Min UV bound - this property is used during UV-mapping. It defines the minimal space on the texture used for a cube. If a cube has width, height or depth lower than one unit of length, this property can be used to make sure that every face will get some space on the texture. Normally in this case a the size of the cube would be rounded down to 0 during UV-mapping and some of the cube’s faces wouldn’t get any space on the texture.
Object properties (armature)
When you open Object properties while having an armature selected, there are 3 new panels visible:
Mcblend: Model Properties
Mcblend: Render Controllers
Mcblend: Animations
Mcblend: Model properties
This panel has some of the basic properties of the Minecraft model like the width and height of visible bounds (they have the same names as in the Minecraft model) and some properties used for texture generation.

Allow texture expanding - allows changing the texture width and height during UV-mapping.
Generate Texture - generates a template texture during UV-mapping (UV-mapping without this option selected will change the UV of the model but won’t generate any texture file).
Template resolution defines the size of the texture. The real resolution of the generated texture image is equal to texture width and height multiplied by texture resolution.
Set minecraft UVs - generates the UV map and texture of the model based on the setting from the properties above.
To perform the UV-mapping, adjust the values of the fields and press the “Set Minecraft UVs” button.
Note
After the UV-mapping, you can still go to the UV editor and move everything to your liking. This operator tries to arrange the UVs of the selected objects on the texture space using the basic non-per-face Minecraft UV-mapping. If you move the UV in such a way that it cannot be mapped in standard Minecraft UV-mapping way, then Mcblend will detect that and it’ll use per-face UV-mapping.
Don’t move individual vertices of the faces on the UV unless you know what you’re doing. The faces on the UV must remain rectangles, or the UV of the exported model may have unexpected shapes.
Mcblend: Render Controllers

This panel lets you quickly create materials. The materials generated using this panel are very similar to the materials that you can find in Minecraft. You can add multiple render controllers to the model. Every render controller can have only one texture. The multitexture materials aren’t currently supported. Render controller can have multiple (Minecraft) materials. They can be assigned using name patterns in a same way as you assign them in Minecraft.
After setting the render controller you can use the Apply materials button to automatically create the materials for preview in Blender.
Mcblend: Animations
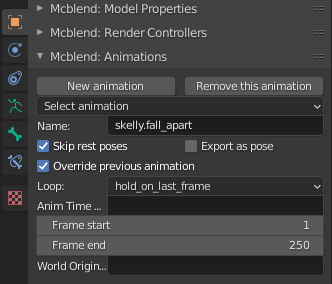
The animations panel lets you quickly switch between animations. The animations in Mcblend are NLA tracks of the armature with some additional data. Switching the animation in the Mcblend: Animations menu also switches active NLA tracks.
New animation - Creates a new animation. You can’t use this operator while editing an action of the armature. If you want to create a new action you need to stash the other action first.
Remove animation - Removes the currently active animation.
Select animation (dropdown list) - Lets you select the animation to edit.
Name - Sets the name of the animation.
Skip rest poses - this checkbox enables animation export optimization. If enabled, the keyframes that don’t affect the armature (because they are the rest poses) are skipped in the exported file. In most cases it’s recommended to enable this option.
Export as pose - if enabled, the exported animation will contain only one looped frame.
Override previous animation - directly translates to the override_previous_animation property of Minecraft animation. It doesn’t affect how the animation is rendered in Blender.
Loop - directly translates to the loop property of Minecraft animation file. There are three options “true”, “false” and “hold_on_last_frame”.
Anim Time Update - directly translates to the anim_time_update property of Minecraft animation file. You should either leave it empty (if you don’t want to have “anim_time_update” in your animation) or put a MoLang expression in it. It doesn’t affect the animation in Mcblend because Mcblend doesn’t support Molang.
Frame start - The first frame of the animation. Doesn’t affect the Minecraft animation. It just tells Mcblend where tha animation starst.
Frame end - The last frame of the animation. Doesn’t affect the Minecraft animation. It just tells Mcblend where tha animation ends.
World Origin - by default the transformations of the animation are relative to the global origin of the 3D space. You can use this field to make them relative to an object. You can put there a name of an object. It’s useful for animating Minecraft’s attachables, when you need to synchronize the animation of an entity and the attachable. The origin of the attachable moves with the movements from the entities animation. You can learn more about this kind of animations in Attachables & First person animations tutorial.
Object properties (bone of armature)
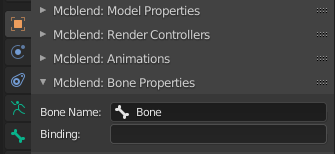
When you open Object properties while having a bone selected in pose mode, there is 1 more additional panel - Mcblend: Bone Properties. It has only two fields:
Bone name - the name of the bone. It’s just a convinient way of viewing which bone is selected. You can use it to rename the bone.
Binding - this property directly translates to Minecraft’s binding property. It’s useful for creating models of the attachables. Id doesn’t affect the model in Blender in any way. You can learn more about creating attachables in Attachables & First person animations tutorial.